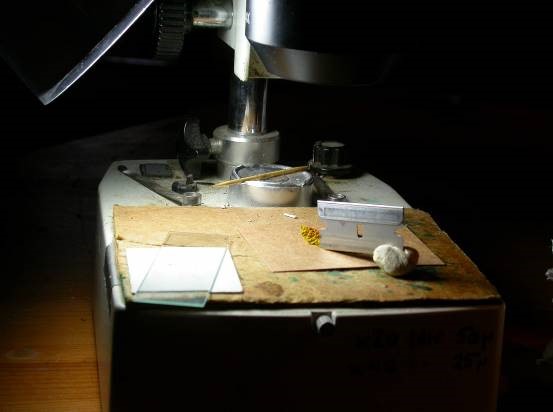
Sectioning a Xanthoria thallus. © Mark Powell
Text and all photos © Mark Powell, 2021 @obfuscans. Download as PDF
Many people seem to shy away from microscopy considering it to be time consuming, fiddly and difficult. These notes draw together various tricks of the trade which should make the techniques more understandable, faster and more successful. Do remember that much useful guidance is given in the Introduction to the ‘Flora’ (Smith et al. 2009). Take note of the methods that different lichenologists and sources suggest and chose what works best for you. After practice, many lichenologists find that microscopy is one of the most interesting and rewarding aspects of their studies.
Care of microscope objectives
Lichenologists often use potassium hydroxide (K) and other reagents for mounting sections (water is often not sufficient to reveal the structures). There is a slight risk that these reagents could cause damage to the high-power objective lenses, either by direct contact or prolonged exposure to fumes. After applying the cover slip, swab away any excess liquid from around the slip using tissue. It is best not to leave slides on the microscope stage for prolonged periods. Look for as long as you want and then remove the slide. If using oil immersion, please think about which way to turn the turret once you have finished looking and before swinging the x100 out of the oil. You want to rotate the turret so that a low power (= short) objective is above the slide (and not a x60 or x40 which might contact the oil). Only the x100 objective is designed to be used with immersion oil.
Cutting sections
We cut sections for various reasons. Sometimes we just want to see what sort of spores the lichen has. Other times the pigmentation and structure of the fruiting bodies is important to achieve an identification. A lot can also be learnt by making careful sections of the thallus; for example, some species of Physcia and Physconia are best separated by observing the structure of their upper or lower cortices. In general, the thinner the section the better (there are very few exceptions).
Upper cortex of Physconia perisidiosa
Upper cortex of Physconia grisea
Note that the hyphae above the algal layer in P. perisidiosa are composed of ‘tubes’ with narrow lumina, while in P. grisea the structure is more ‘cellular’.
Think of sectioning as like cutting miniature slices of bread. It is usually best to achieve thin, vertical and even slices. (One exception is when you want to achieve an ultra-fine section, when a tapered section, ‘running out to nothing’ can simulate an ultra-fine section close to the thin edge of the wedge). One difference from cutting a loaf is that you don’t (normally) use a sawing action with the blade. With a sharp blade, a gentle slice backwards is sufficient.
Practice makes perfect. If you struggle to cut thin sections then consider collecting some spare material of, for example, Lecidella elaeochroma to practice with. With plenty of material to go at you can cut, cut, cut and see how thin you can go. See if you can achieve nice even slices about 25 µm thick. A human hair is about 75 µm thick and the prospect of slicing a hair into thirds may sound hopelessly daunting. But cutting thin slices across a disc is much easier than trying to cut a hair lengthways. Try to get into the habit of holding your blade vertically. There is a real satisfaction in achieving good thin sections and they are more informative than a ‘squash’ (a thicker section or chunk which has been pressed until thin enough). If you can’t get sections as thin as 25 µm then don’t despair. Just cut as thin as you reasonably can and then gently squash your thicker section. I use a piece of tissue paper folded over the slide and use finger and thumb to apply gentle pressure.
If you are trying to understand the anatomy of an apothecium, then it is important to cut a slice through the middle of the disc. Normally you would cut through nearly half way across and discard the smaller piece by flicking it out of the way. If you have very limited material you may not want to discard half an apothecium, so you may decide to use more peripheral slices. Alternatively, you could cut a ‘trench’ in the centre of the apothecium to allow removal of central slices while retaining most of the fruit – tricky but worth doing in certain circumstances.
The ‘Flora’ suggests moistening dry material, but this is usually unnecessary or undesirable. In general, try sectioning material as it is presented and only bother moistening when required. When damp, the material is often too soft and flexible to allow fine sections to be cut. Dry material, while slightly tougher, allows much thinner and more accurate sections to be pared off.
Scalpels and single-edged razor blades are relatively thick but are preferred by some for safety reasons. Double-edged razor blades are thin and have a very fine edge which cuts superb sections. The usual recommendation is to break these types of blades in half before use, but the resulting narrow blade can be more difficult to manipulate with precision. Very recently I was tipped off about how good the blades are in disposable razors. They are very fine and come to a right-angle at the end. Although they are narrow, I find that they cut so fantastically well that I can put up with them being a bit fiddly. It is possible to get them out reasonably safely, working from the back and prising off the plastic top with a screwdriver but only attempt this if you are confident with doing such things. Yet another option, the one I currently use, is to cut a double-edged razor blade into two blades, then cut off one end to make a right-angle (in effect making something similar to those which are prized out of disposable razors, but without having to extract them from their plastic holders). Surprisingly, ordinary scissors cut razor blades successfully. When the working end of the blade is blunt, that short blunt piece can be cut off the end and this can be continued until the blade becomes too short to hold conveniently.
Getting the lighting right is important. Most people cut sections with the aid of a dissecting microscope and often use these with the built-in light shining directly towards them. This can result in working in the shadow cast by the blade and fingers. For right-handed lichenologists it is advantageous to have the illumination coming in from the left-hand side – this can be achieved by swivelling the optical part (head) of the stereo- by 90 degrees or by using a separate light source. An LED spotlight on a flexible stalk is effective and is usually cheaper than replacing the bulb in a dissecting microscope when it blows. When purchasing a dissecting microscope, if the model you want is supplied cheaper without built-in lighting, I would save money and go for that, then get an LED clip-light/desk light on flexible stem to go with it.
Sectioning a Xanthoria thallus (hand removed from razor, which is now held in place with tack). Note razor at shallow angle, anchored in card behind the cut, the blade will now be drawn gently backwards (towards right edge of photograph) with tip of razor still in contact with card. Also note light coming in from the left, and microscope slide conveniently close on stage of dissecting ‘scope’ (a droplet of mountant is already in middle of slide ready to receive the section).
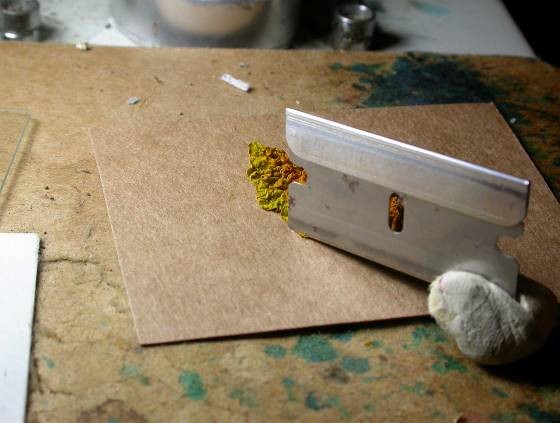
Closer view of sectioning, the thin sliver to be examined will be pared off on left side of blade.
If you can only afford one microscope then a compound microscope will get you further than a dissecting microscope. The former is required to examine the spores and other internal features. Although less convenient than a dissecting microscope, a watchmaker’s eyeglass can be used instead (as our Victorian forebears did).
Once a good section is cut there is a bit of skill involved in transferring it to the microscope slide. Most people have a drop of mountant ready on the slide and transfer the section to it using the corner of the razor blade (or tip of scalpel blade). Thin sections are slightly less likely to be lost in transit since they have less weight to counteract adhesion to the blade. This adhesion is enhanced if the tip of the blade is moistened (and you will see some lichenologists insert the tip of the blade between their lips to apply the slightest smear of saliva).
Cyanolichens (such as Collema and Leptogium) are usually easier to section when dry. In this state a sharp blade will pare off a fine sliver. Wet cyanolichens remain tough but become floppy making it difficult to cut them accurately. It can be frustrating when attempting to section the thallus of foliose or fruticose lichens as the structure often moves under the pressure of the blade. Sometimes it may be necessary to stick the structure to a piece of card. Lichens on tiny slivers of bark and minute flakes of rock are also more easily dealt with if stuck to card.
When cutting a section, it is difficult to achieve the required accuracy by hovering over the specimen. It is best to ‘anchor’ the tip of the blade in the substratum and then draw the blade through with the leading edge slightly raised. The anchored end is at the far end of the section from the lichenologist, who draws the blade towards themselves.
Working on saxicolous material inevitably ruins many razor blades as the slightest contact with the rock surface folds the fine edge over. Search online for cheap sources of razor blades if you intend to do a lot of slicing on rocky substrata and consider ‘snipping’ the blunt end off with scissors to get several ‘goes’ out of each blade, as explained earlier.
Many people complain that they struggle to section saxicolous Verrucaria species and other pyrenocarps on stone, especially immersed ones. Consider using the tip of a single-edged razor (relatively robust) to dig around in the substrate to expose one side of the perithecium. Then a finer blade can be used to make sections now that the main excavations have been completed. Often the whole perithecium becomes detached during the excavation works. If so, the best thing is to put a tiny drop of adhesive (I find Copydex best) on to a card and semi-immerse the perithecium in the glue. Once the Copydex is dry, the perithecium can be conveniently and accurately sectioned (as if it was embedded in wax).
Some people contemplate the purchase of a microtome to cut slices, but this piece of equipment is rarely used for ordinary identification purposes. Often the specimen requires embedding in wax and then there is the difficulty of orientating it correctly to get a vertical slice. In general, a microtome is best left for specialist applications.
Staining – the ink-vinegar method
All the usual staining methods infill the lumina of the hyphae; they do not stain the chitin walls of the hyphae. It is important to understand this, or else lichen structures can be easily misinterpreted. Staining with ink gives similar results to using the old traditional lactophenol-cotton blue (LCB) but with some advantages. LCB is potentially carcinogenic and certainly messy making it difficult to wipe slides clean with tissue. LCB also requires heating for good results. (LCB does have the advantage of producing semi-permanent slides while ordinary ink-vinegar methods dry out rapidly). Parker blue-black ink appears to be particularly good.
Method A (K/ink-vinegar): Put a drop of K on a microscope slide, add sufficient ink to colour the K darkly. Transfer your section to the inky drop and apply a cover slip. Then put a drop of acetic acid at the edge of the cover slip – it will readily sweep through removing the excess ink. Heating the slide before adding the cover slip tends to give superior results but it is not usually essential.
Method B (N/ink-vinegar): Same as Method A but use nitric acid in place of K.
Notes:
The concentrations of the liquids are not critical. 10% K, 10% acetic acid and 30% nitric acid work fine. If you haven’t got acetic acid to hand, then use vinegar – even brown malt vinegar works. Sodium hydroxide (caustic soda) solution is a good substitute for K.
If you want to heat a slide a tea-light candle is convenient. For best results you want to get the drop of stain hot but not boil it dry. Hold the slide two or three inches above the top of the flame. Heating is best done before applying the cover slip. With a cover slip on you risk generating rather explosive bubbles formed which can disrupt the section.
Using nitric acid (rather than K) has a slight tendency to produce better results cold but that is not the main reason it is used. When examining specimens of Thelidium incavatum and its look-alikes, I tend to simply winkle out a whole perithecium because sectioning these immersed pyrenocarps ruins razor blades and often it is only the nature of the spores that is required (not the anatomy of the perithecial wall). The nitric acid in the mix dissolves any adhering particles of limestone allowing proper squashing. The nitric acid is also superior at revealing the septation and the septa are made even more conspicuous with ink in the mix. (Thelidium incavatum, T. decipiens, Polyblastia dermatodes and P. albida cannot be reliably separated in the field).
Eight ascospores of Polyblastia dermatodes, still within the ascus, the septation made conspicuous by the N/ink-vinegar method.
Another use of the nitric acid version of the ink-vinegar stain is to make crystals in the Lecanora subfusca group more easily visible – especially if you don’t have a polarizer to hand. The ‘massive crystals’ in the thalline margin of several species ought to be visible even in water mounts but they are spectacular after staining. Of more use is the way that the stain makes epithecial crystals in this group more easily visible. L. chlarotera, L. pulicaris and L. argentata all look similar in the field and all have massive crystals in their margins. L. pulicaris is separated by its Pd reaction. L. chlarotera has epithecial crystals while L. argentata does not. Sections in water can be difficult to interpret since the irregular surface of the hymenial gel can resemble a crust of crystals. It is no use using the K version of the stain because these epithecial crystals dissolve in K. The Flora tells us that they are also soluble in N, but this is not the case. Malíček (2014) claimed that these crystals were slowly soluble in N but in a personal communication he has since found that they dissolve slowly in his old batch of nitric acid but do not dissolve in fresh nitric acid.
Section of Lecanora chlarotera after N/ink-vinegar staining. The massive crystals in the thalline margin have taken on a violet-purple colour, apparently a reliable indicator of calcium oxalate (though more work is required to confirm this). The epithecial granules are still present, at this magnification only visible as a brown layer at top of hymenium.

Upper hymenium of Lecanora chlarotera after N/ink-vinegar staining. The epithecial crystals are present as distinct grains.
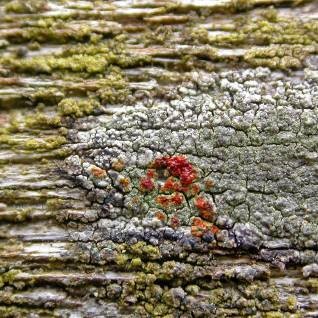
Xanthoria parietina
We will now look at sections of the thallus of a very common species to see how staining helps elucidate the structure. X. parietina is a foliose lichen with leafy lobes, the lobes having an upper and a lower cortex (skin). If you cut through one of the lobes and look at the cut face you should be able to see, even with just a x10 hand lens, that it is layered and that there is a thick white lower layer, a thin green layer above and a yellow upper skin. Now we will see what this structure looks like microscopically.
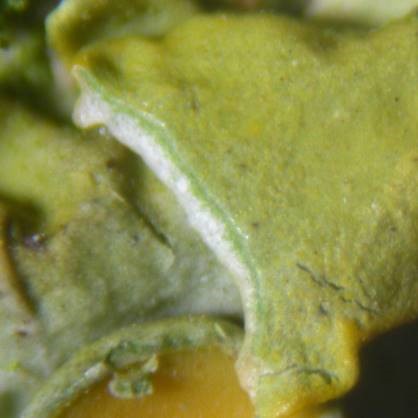
The appearance of a lobe of Xanthoria parietina, cut through with a razor blade, showing the deep white basal layer, the green layer above and the yellow upper skin. You should be able to see similar through a hand lens.
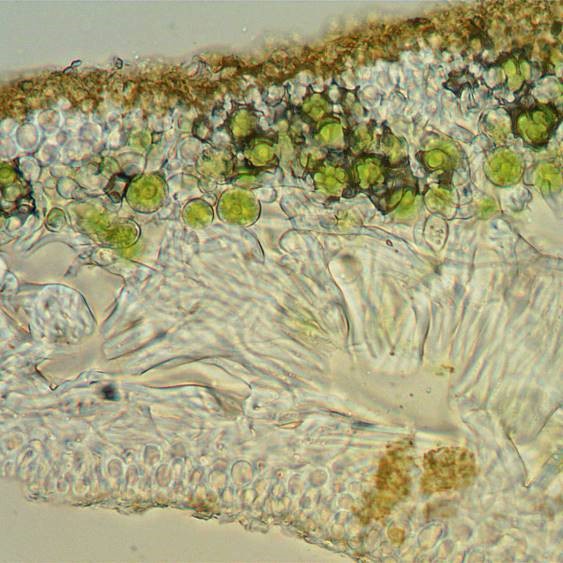
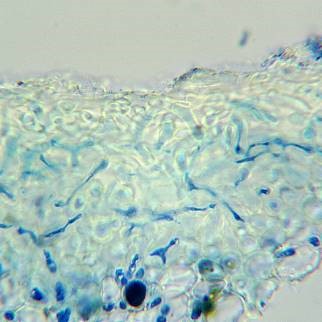
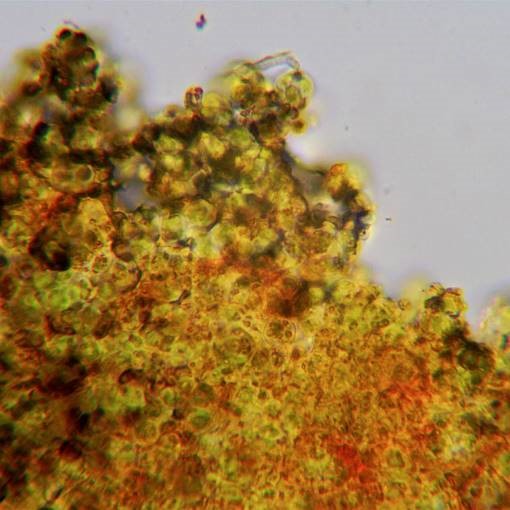
A thin section of a lobe of X. parietina seen with a compound microscope. This was prepared by cutting a thin section by hand with a razor blade and mounting in water on a microscope slide. Starting from the lower surface, there is a thin lower cortex which roughly resembles bubble wrap and above that a layer of loosely packed hyphae (medulla). In the upper third of the section the green algal cells are conspicuous, and these continue up into the upper cortex (which again resembles bubble wrap). The upper surface is encrusted with minute orange-brown crystalline granules.


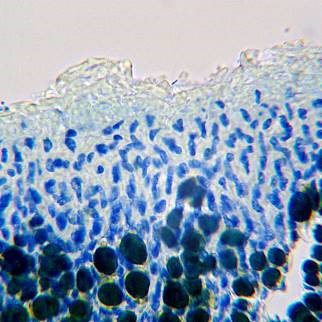
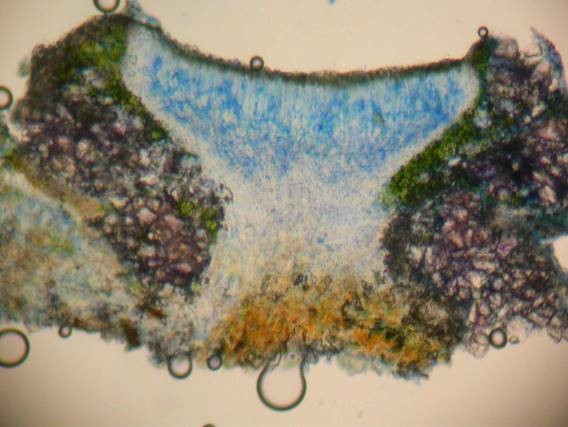
Xanthoria parietina, section after staining with ink-vinegar. Composite image, upper cortex, algal layer and upper medulla in upper half, lower medulla and lower cortex below.
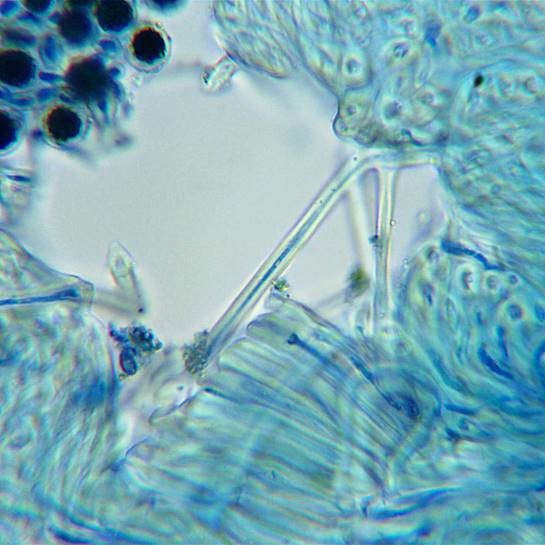
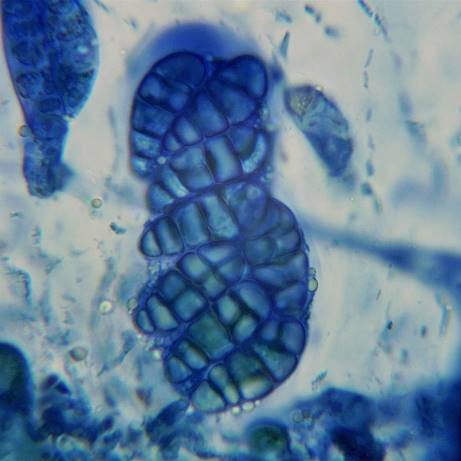
A highly magnified image of stained medullary hyphae showing that they are hollow segmented tubes, the central hollow of the tubes (where the cells contents were) now filled with blue ink.
When I have led courses in the past I illustrate the structure of a lichen by building a 1000x scale model using bubble wrap, pipe cleaners, peas and yellow glitter. Unfortunately, I don’t have a photograph of such a model to hand but imagine me laying down about three layers of bubble wrap to form the lower cortex. The medulla is then made of slightly scrunched pipe cleaners. Thin plastic tubing would be more representative of the hollow hyphae, but pipe cleaners hold a more convincing form and create a thick model medulla. The algal layer straddles the upper medulla and the lower cortex, and I add one layer of bubble wrap and then some peas (simulating algal cells), then another layer of bubble wrap then more peas and finish off the layering with a couple of sheets of the bubble wrap. A finishing touch is to sprinkle on some yellow glitter to simulate the crystalline pigment encrusting the surface of the cortex. Think about the scale for a moment. At 1000x, one millimetre on the model simulates one micron in real life, and one metre simulates a millimetre. A human hair is something like 70 to 80 microns in diameter and hence would be represented by a fence post.
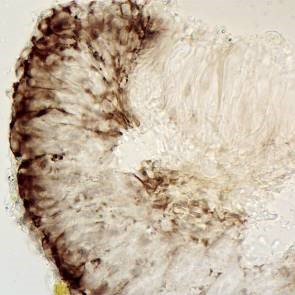
Bacidia caligans section
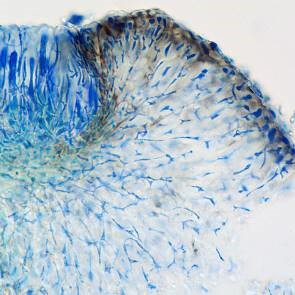
Bacidia caligans section stained K/ink-vinegar
K/ink-vinegar stain revealing the structure due to the lumina of the hyphae demarcated by stain.
ASCUS TIPS (IODINE TESTS OF ASCUS APEX)
The procedure outlined in the ‘Flora’ (Smith et al., 2009, pg. 14) sounds like a bit of a palaver and puts some people off. Steps 4 and 6 are not directly relevant to elucidating the nature of the ascus. A cover slip is applied at Step 4 requiring subsequent treatments to be drawn through with a tissue. The K is left for five minutes as a pre-treatment.
A simpler procedure might be:
- Place section in a drop of K on a slide
- Wait five minutes or gently heat for ten seconds or so
- Swab surplus K and add a drop of Lugol’s iodine
- Apply cover slip and examine
The pre-treatment with K is mainly used to disperse any hymenial gel. If this gel is not dissolved it can hinder the technique in two ways. Firstly, the gel itself may produce an amyloid reaction and obscure the fine detail in the ascus tips. Secondly the gel binds the asci together. Ideally you want the asci to separate easily so that they can be examined individually but without having to exert undue pressure on them. [The pre-treatment may alter the subsequent iodine reaction of the hymenial gel in some genera. With Arthonia you tend to get red reactions without pre-treatment but blue reactions with.] Some genera, especially those with little or no hymenial gel, produce good results even without pre-treatment (Catillaria is an example). In the Flora procedure, the K is flushed away with water before adding the Lugol’s but the latter can be used itself for flushing. Even better, dilute acetic acid (e.g. ordinary distilled vinegar) can be used to ‘neutralise’ the K. If excess K is present, the blue amyloid reaction won’t appear while too much concentration of iodine can result in an amyloid reaction which is too intense. It is sometimes necessary to push the reaction back and forth (intensifying with iodine and weakening with K or water) to get the ideal intensity of reaction. Often it helps to use a weaker solution of Lugol’s than generally recommended. Sometimes you just have to keep on trying until you happen to get an ascus properly separated, at the right stage of development and appropriately stained.
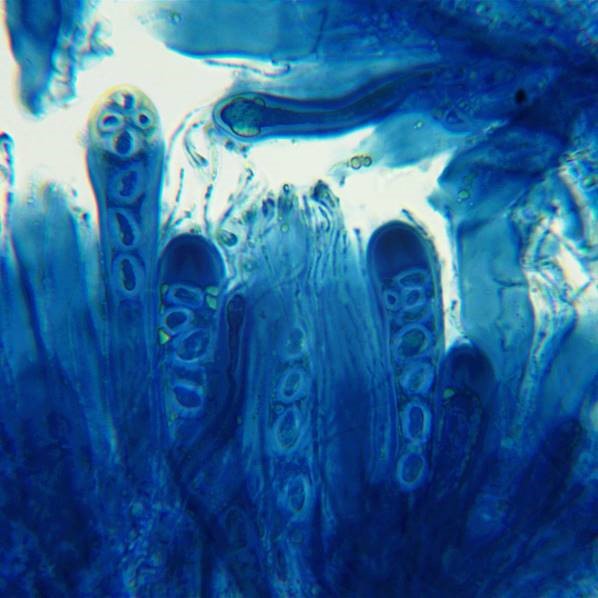
Lecidella elaeochroma, showing amyloid reaction within the ascus tips. The ‘Flora’ states that Lecidella has Lecanora-type ascus tips but in reality, the non-staining central apical cushion does not extend to the top of the apical dome as it does in Lecanora. The type of ascus tip shown here is now called Lecidella-type.
Using oil immersion
Some people are reluctant to use oil immersion, thinking it fiddly and messy. This is a shame as it is not difficult. One problem that several people have had is the application of too small a drop of oil to the microscope slide resulting in a failure to create a complete layer of oil between cover slip and x100 objective. When you see how close this objective is to the cover slip it is easy to assume that only a minute droplet will suffice. However, the objective may have a concavity which takes more oil to fill than imagined, especially when it has not been used before. On the other hand, you don’t want a great messy drop of oil. A cocktail stick can be useful for applying an appropriate amount. Find out where you want to observe on the slide using a high-power objective, then swing that one out of the way and the column of light coming up from the condenser will show you where to apply the drop of oil. Now swing the x100 objective into place and you should get a good sharp image when in focus. If it is hopelessly ‘foggy’ then suspect that you don’t have enough oil. Be careful not to swing the x40 or x60 in to position while the oil is present as it can be difficult to clean off. If you like wiping slides clean as you go (rather than accumulating a lot of washing up) then you will be disappointed by the smeary oil. If, however you wipe the bulk off and then add a drop of meths, then you can wipe it clean with tissue.
The C+ red reaction of apothecial sections
In certain genera (and particularly in Micarea) the presence or absence of a C+ red reaction of the apothecial section or thallus is important for identification. This reaction is fleeting so it is usually observed by mounting the section in water and then observing any reaction as the advancing front of C sweeps across the section. The C is applied to the edge of the cover slip and capillary action draws it through. I like to use strong solutions of C and the concentrated commercial sources (e.g. Domestos and Parazone) are rather gloopy and this makes them reluctant to draw under the cover slip. When I break a cover slip I keep a few shards to hand and then use one of these to prop up one side of the cover slip before adding gloopy C to that side. This prevents the frustrating wait for the gloop to slowly work its way across to the section; the space created under the cover slip allows the C to rush underneath. Otherwise you could place the cover slip so that the section is close to one edge, so you don’t have to wait for the C to get all the way to the middle.
Using paraphenylenediamine (Pd)- Standard lab technique
The standard method of using Pd is to place a very few sugar-grain sized crystals in a watch glass and add a couple of drops of alcohol. The test is then performed by transferring a drop of the resulting solution to the specimen (I use the tip of a cocktail stick, others use the corner of a razor blade). The resulting solution, if made up in a vial to stop the alcohol evaporating, rapidly oxidizes and becomes useless within a matter of hours. If allowed to dry out in the watch glass, the residue becomes stable again and can be retained to perform future tests by rewetting with alcohol. Eventually, after ten or twenty tests, the residue will go dark and ‘cruddy’ and then it is time to discard and start with some fresh crystals.
The powdery residue after drying out is like dust and can easily contaminate the surroundings if not kept carefully stored. A bottle top will serve as a disposable watch glass. For alcohol, you can use methylated spirit or any potable spirit of approx. 40% by volume. The slight brown colour of scotch won’t affect the appearance of the reaction. Brodo et al. (2001) suggest that so little is needed for spot tests that 10 grams or so should last you more than ten years. If you are using more than a heaped teaspoonful per decade you are either a very prolific lichenologist or using it profligately.
The Pd+ red reaction (fumarprotocetraric acid) of Violella fucata.
Alcoholic Steiner’s solution
Steiner’s solution contains an antioxidant (sodium sulphite) to slow down the degradation of Pd solutions from hours to weeks or months. The normal recipe for Steiner’s solution is given as 1 g paraphenylinediamine, 10 g sodium sulphite, c. 0.5 ml detergent and 100 ml water. This preparation should last for several months but it has the reputation for giving slow, weak reactions. It would be unfair of me to add to the criticism because I have not used it myself; as soon as I acquired some sulphite, I experimented with an alcoholic version. I presumed that Pd is more soluble in alcohol than it is in water and that is why alcoholic solutions have the potential to give stronger reactions. Being unsure whether sodium sulphite is soluble in alcohol, my thoughts turned to vodka as a happy ratio of alcohol to water. I can’t provide an exact recipe because I make up tiny batches in a small dropper bottle but, as a guide, a dozen or so granulated-sugar-grain sized crystals of Pd and ten times that volume of sodium sulphite in about a teaspoon or two of vodka should give a strong solution which will keep for several months. The efficacy of a batch can be tested on something containing fumarprotocetraric acid such as Cladonia coniocraea. At room temperature a colour change should start almost immediately and produce a deep rust-red in less than twenty seconds. Not only does my dropper bottle of alcoholic Steiner’s accompany me in the field but it has replaced the watch-glass of loose crystals on my bench. I use a cocktail stick to transfer a tiny spot of solution to the specimen.
Some Pd reactions which are difficult to observe as a spot reaction (due to them being weak) can be performed by using an alcoholic solution of Pd as the mounting medium for a microscope section.
Fragment of thallus mounted in alcoholic Pd solution. This shaded specimen of Halecania viridescens was producing only a very weak reaction when performed as a spot reaction, even with very strong alcoholic Pd. In section a very clear Pd+ orange-red, due to argopsin, is observed.
References
- Brodo, I.M, Sharnoff, S.D. & Sharnoff, S. (2001) Lichens of North America. New Haven and London: Yale University Press.
- Malíček, J. (2014) A revision of the epiphytic species of the Lecanora subfusca group (Lecanoraceae, Ascomycota) in the Czech Republic. Lichenologist 46: 489-513.
- Smith, C. W., Aptroot, A., Coppins, B. J., Fletcher, A., Gilbert, O. L., James, P. J. & Wolseley, P. A., (eds) (2009) The Lichens of Great Britain and Ireland. London: British Lichen Society.